Computer puppetry is the process of animating an on-screen figure, making it follow a predefined set of movements. A puppetry animation can be as simple as having a stick figure walk across the screen; more complex puppetry animations involve multiple objects performing far more complicated maneuvers while interacting with each other, but the general process is the same. Unlike a video game, a puppet is animated using pre-defined movements as opposed to movements that the user inputs in real time.
I recently completed a project for one of my college classes that involved animating a stick figure's walk in both 2D and 3D. I will describe the process below. Here is a video I created of the final project.
This article assumes at least some knowledge of computer animation and 3D graphics – please read these articles first to avoid confusion with terms such as "perspective" and "tweening".
Basic steps
The basic concepts of puppetry can be outlined as follows:
- Define the figure as (at the very least) a set of points
- Determine the steps that the figure will take, and how the steps will interact with each other.
- Compute starting and ending keyframes for each step. This also involves checking for the ending position, and adjusting it as necessary.
- Tween the keyframes to perform the actual animation
- Render the figure on the screen as it moves
Defining a puppet
Consider a basic stick figure. It consists of 2 feet, 2 knees, 1 hip, and various interconnecting lines. (For simplicity, we will ignore the arms for now.) In order to draw the puppet on the screen, we can simply connect the points with lines, at least for the time being.
Animating the puppet is as simple as changing the positions of these points as the puppet moves forward. However, in order to have a realistic animation, there is a lot of math involved in calculating every point. A good design minimizes the possibility of improperly setting parameters (i.e. putting the knees above the head or allowing the legs to stretch out as the puppet walks), and if every point in the puppet is externally accessible, this is all too easy to do. (My group learned this the hard way, unfortunately.)
The trick here is to define the minimum number of points necessary to uniquely and unambiguously represent the puppet – in this case, we only need 2 feet and a hip. The knees can be calculated dynamically, before the puppet is drawn; the rest of the puppet's body can be drawn on the screen relative to those 3 points. This ensures that the knees are always correctly calculated given the feet and hip positions.
We can take this a step further and use knowledge of the human anatomy to correctly proportion the puppet. At a bare minimum, we can consider the head to be the unit; consider the torso to be 3 heads long and the thigh and shin to be 2 heads long each. This results in a figure that is 7 heads tall when standing up and approximates actual human body proportions.
The same holds true in the 3D world – the puppet will be defined by a hip and 2 feet, although many more points will need to be calculated in order to form the rest of the puppet. This will be outlined later once we've established the basics of 2D puppetry.
The Walking Process
Atomic Operations
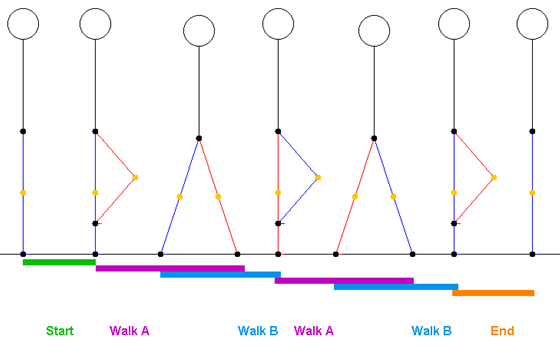
Think about the way you walk: you lift one leg, move it forward and down until it touches the ground, then move the other leg forward and repeat the process. Below is an idealized representation of this, with different colors being used for the two legs to distinguish them.
Each of these four walking states can be seen as an atomic operation – "atomic" in the sense that the entire walk is comprised of these 4 motions, and each motion is a complete operation that cannot be subdivided further. This concept will be used later on in the actual program to perform the walking animation.
Walker
In order to keep track of the walk, we need a module that swaps between atomic operations as the puppet walks. This is known as the "walker".
The puppet will start in the standing position. From there, the "start" operation will lift the puppet's leg (consider this the "resting state" as he walks). Then, the "walkA" and "walkB" operations will alternate until the puppet reaches its end point. Finally, the "end" operation will bring both feet to the same position, resulting in a puppet that stands still.
The walker must also keep track of which leg is moving forward, since the puppet has 2 separate legs. Although you can get away with animating a single leg in 2D, this falls apart when you attempt to do it in 3D since both legs will actually be visible.
Puppet
The puppet stores (and makes available) the 3 black points in the above images, which correspond to the two feet and the hip. It calculates all of the orange points as outlined below. The puppet is also in charge of rendering itself, and provides constants defining its size and motion to allow other parts of the program to more easily use it.
Of special note is the stride length, which represents the number of units that the puppet moves forward during an atomic operation.
Calculations
The black dots in the above images represent the points that are calculated by the atomic operations. The orange points must be calculated based on these. This will ensure that no matter where the feet and hip are (within obvious limits), the legs will automatically bend as necessary and the leg halves (thigh and shin) will remain the same size.
Knee motion
If we draw a line between the hip and a foot, it forms the base of a triangle in which the other two sides are the leg halves and the vertex facing the line is the knee.

We can thus determine the distance from the line to the knee by calculating the area of the triangle using Heron's formula (which takes in 3 side lengths that are easily obtained) and then obtaining the triangle's height using the usual method.


This is only half the problem, however – the angle of the leg must be taken into account. This can be done by determining the proportion between the values of L and d in the above calculations. Once we have the proportions, we can calculate the X and Y coordinates of the knee as follows:

![mid= [�(midX@midY)]=[�((hipX+footX)/2@(hipY+footY)/2)] mid= [�(midX@midY)]=[�((hipX+footX)/2@(hipY+footY)/2)]](/images/eqn_mid_midx_midy_hipx_footx_2_hipy_footy_2.png)


Motion of feet and hip
To simplify things, the feet are moved forward during the animation and the new hip is computed based on the positions of the feet. This is straightforward in the horizontal direction – the hip is always exactly between the feet. However, the vertical position of the hip must be adjusted.
When the feet are spread apart, the hip must be lower than when the feet are together. Thus we calculate the hip's vertical position using Heron's formula as well, using the triangle formed by the lines between the hip and the projections of both feet on the ground. The hip's vertical position is simply set to the height of this triangle.
Puppet's body in 2D
The rest of the 2D puppet's body is easy to calculate based on the hip. Simply draw the torso as a line from the hip to a point that is 3 units above the hip, and then draw the head with a radius of 1 unit and a center of 0.5 units above the top of the torso.
Moving to 3D
Once the 2D puppet has been established, moving to 3D is fairly straightforward. The main difference here is that instead of walking along the X axis, the puppet now needs to walk along an arbitrary line on the X-Y plane (which represents the ground; the Z axis points upwards). This requires us to store the direction of the puppet's motion, and the simplest way of doing this is via a unit vector.
The unit vector ![U = [Ux, Uy] U = [Ux, Uy]](/images/eqn_u_ux_uy.png) is a vector with magnitude 1 and any angle of
our choice. When stored as a pair of coordinates, we can use it as follows to
orient any object in the direction of the unit vector:
is a vector with magnitude 1 and any angle of
our choice. When stored as a pair of coordinates, we can use it as follows to
orient any object in the direction of the unit vector:
![[�(X@Y)]=[�(x�U_X@y�U_Y )] [�(X@Y)]=[�(x�U_X@y�U_Y )]](/images/eqn_x_y_x_ux_y_uy.png)
Another important vector is the unit normal, which is perpendicular to the unit vector. It is obtained by rotating the unit vector by 90 degrees. This allows us to easily position things perpendicular to the puppet's direction of motion – such as the puppet's body itself.
![U_N=[�(?-U?_Y@U_X )] U_N=[�(?-U?_Y@U_X )]](/images/eqn_un_uy_ux.png)
Animation mechanics
Tweening works in 3D the same as it does in 2D (and 1D); only the data types of the points must be changed. Thus, when calculating start and end points, the stride length can be multiplied by the unit vector to obtain the separate X and Y offsets that will be added on to the end points.
The knees in 3D work more or less the same, but again, the forward motion of the knee must be multiplied by the unit vector in order to keep it straight in front of the puppet.
Puppet body in 3D
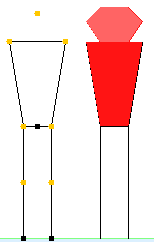
The 3D puppet body is a plane instead of a stick figure. Although the same 3 control points (feet and hip) are used, there are far more intermediate points calculated based on them. Refer to the figure below.

The feet are spaced apart by 1 unit perpendicular to the puppet's direction of motion (that unit normal vector sure comes in useful!). Thus there are effectively 2 hip joints used for the leg's motion. The rest of the puppet is essentially arbitrary; it doesn't even have a head in the wireframe render.
Program Organization
Classes
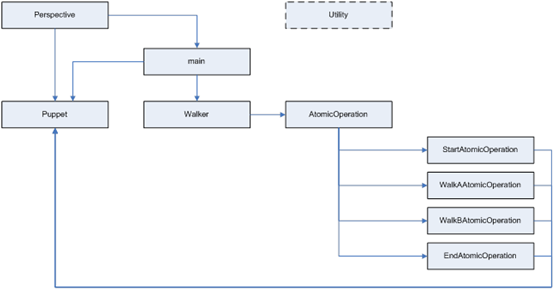
The entire program is organized into a Java package. The following classes are used:
- main: In charge of the user interface, animation, and user input
- Puppet: Keeps track of the puppet and draws it to the screen
- Walker: Keeps track of each atomic operation, loading them as necessary to move the puppet.
-
AtomicOperation: An abstract class that contains the animation
logic for the walking process – lifting the leg, moving the foot forward, and so on.
There are 4 different atomic operation classes inheriting from it, as outlined above: StartAtomicOperation, WalkAAtomicOperation, WalkBAtomicOperation, EndAtomicOperation Each of these calculates the start and end points of the step, and the AtomicOperation superclass tweens between those points. - Perspective: Performs all functions for converting from the 3D world coordinates to screen coordinates. Used by both Puppet and main.
- Point2D: Data type for a 2D point using doubles
- Point3D: Data type for a 3D point using doubles. Contains methods that modify the point and allow for easy 2D/3D conversion at the data level (i.e. quickly create a 3D point given a 2D point and a Z coordinate).
- Vector2D: Stores a vector (magnitude + direction) as X, Y coordinates from the origin. Contains methods to compute unit vector and unit normal.
- utility: Static class that contains (mostly) mathematical functions used by the rest of the program.
Interaction of classes
The following diagram shows the interaction between the main classes in the program. Note that Point2D, Point3D, and Vector2D have been omitted for brevity.
User Input
The program receives the origin and coordinates of the start and end points from mouse clicks on the screen. Instead of mapping the 2D screen plane to the 3D X-Y plane, the distance of the mouse from the center is taken; this requires 2 clicks to define each point but is much simpler to implement.
The program also allows the user to modify the 3D angles θ and φ using the W, A, S, D keys, the 3D parameter ρ using the left and right arrow keys, and start/stop the animation using the up and down arrow keys.
Rendering
Animation
As established previously, the atomic operations are in charge of moving the appropriate parts of the puppet from one state to the next. There are many ways of doing this, but the best way I found was to use the concept of keyframes. A keyframe is simply a fixed point in the animation; keyframes are chosen to represent the starting and ending states of the walking process in this case.
You are strongly encouraged to read the animation article before you continue with the rest of this one.
Drawing the puppet in 3D
The Perspective class takes care of the 3D transformations necessary to render the puppet in 3D.
Again, please refer to my 3D Graphics article for more details of the process.
Source Code
I am unable to release the full source code to this for obvious reasons as this was a class assignment. However, I hope that this guide has been helpful to you. If you would like any clarification – possibly with code examples – please mention it in the comments and I will do my best to explain it better.


![[XML]](/images/xml.png)
Comments (2)
Great article otherwise, really helped me with my testing of the comment form.
Leave a comment